TOP Contributors

  1. MIKROE (2663 codes)
  2. Alcides Ramos (358 codes)
  3. Shawon Shahryiar (307 codes)
  4. jm_palomino (112 codes)
  5. Chisanga Mumba (90 codes)
  6. S P (73 codes)
  7. dany (71 codes)
  8. MikroBUS.NET Team (35 codes)
  9. NART SCHINACKOW (34 codes)
  10. Armstrong Subero (27 codes)

Most Downloaded

  1. Timer Calculator (137114 times)
  2. FAT32 Library (70239 times)
  3. Network Ethernet Library (56131 times)
  4. USB Device Library (46445 times)
  5. Network WiFi Library (42082 times)
  6. FT800 Library (41408 times)
  7. GSM click (29124 times)
  8. mikroSDK (26567 times)
  9. PID Library (26504 times)
  10. microSD click (25491 times)
Libstock prefers package manager

Package Manager

We strongly encourage users to use Package manager for sharing their code on Libstock website, because it boosts your efficiency and leaves the end user with no room for error. [more info]

< Back
mikroSDK Library

TouchKey 4 click

Rating:

5

Author: MIKROE

Last Updated: 2018-04-23

Package Version: 1.0.0.0

mikroSDK Library: 1.0.0.0

Category: Capacitive

Downloaded: 4642 times

Not followed.

License: MIT license  

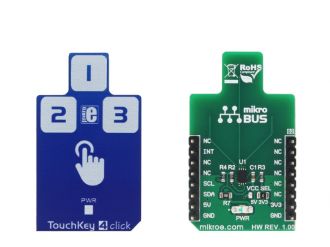
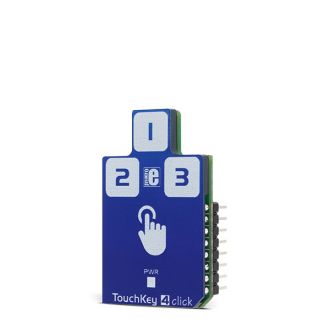
Touch Key 4 click is a capacitive touch sensing Click board, with the advanced touch/proximity sensor IC. Touch Key 4 click has three independently configurable channels and can work in several operating modes, including multiple button pattern detection mode, combo mode, press and hold detection mode, power button mode, and more.

No Abuse Reported

Do you want to subscribe in order to receive notifications regarding "TouchKey 4 click" changes.

Do you want to unsubscribe in order to stop receiving notifications regarding "TouchKey 4 click" changes.

Do you want to report abuse regarding "TouchKey 4 click".
  • mikroSDK Library 2.0.0.0
  • Comments (0)
DOWNLOAD LINK RELATED COMPILER CONTAINS
mikroBasic PRO for ARM
  • lib
  • src
  • exa
  • hlp
  • hex
  • sch
  • pcb
  • doc
mikroBasic PRO for AVR
  • lib
  • src
  • exa
  • hlp
  • hex
  • sch
  • pcb
  • doc
mikroBasic PRO for dsPIC30/33 & PIC24
  • lib
  • src
  • exa
  • hlp
  • hex
  • sch
  • pcb
  • doc
mikroBasic PRO for FT90x
  • lib
  • src
  • exa
  • hlp
  • hex
  • sch
  • pcb
  • doc
mikroBasic PRO for PIC
  • lib
  • src
  • exa
  • hlp
  • hex
  • sch
  • pcb
  • doc
mikroBasic PRO for PIC32
  • lib
  • src
  • exa
  • hlp
  • hex
  • sch
  • pcb
  • doc
mikroC PRO for ARM
  • lib
  • src
  • exa
  • hlp
  • hex
  • sch
  • pcb
  • doc
mikroC PRO for AVR
  • lib
  • src
  • exa
  • hlp
  • hex
  • sch
  • pcb
  • doc
mikroC PRO for dsPIC30/33 & PIC24
  • lib
  • src
  • exa
  • hlp
  • hex
  • sch
  • pcb
  • doc
mikroC PRO for FT90x
  • lib
  • src
  • exa
  • hlp
  • hex
  • sch
  • pcb
  • doc
mikroC PRO for PIC
  • lib
  • src
  • exa
  • hlp
  • hex
  • sch
  • pcb
  • doc
mikroC PRO for PIC32
  • lib
  • src
  • exa
  • hlp
  • hex
  • sch
  • pcb
  • doc
mikroPascal PRO for ARM
  • lib
  • src
  • exa
  • hlp
  • hex
  • sch
  • pcb
  • doc
mikroPascal PRO for AVR
  • lib
  • src
  • exa
  • hlp
  • hex
  • sch
  • pcb
  • doc
mikroPascal PRO for dsPIC30/33 & PIC24
  • lib
  • src
  • exa
  • hlp
  • hex
  • sch
  • pcb
  • doc
mikroPascal PRO for FT90x
  • lib
  • src
  • exa
  • hlp
  • hex
  • sch
  • pcb
  • doc
mikroPascal PRO for PIC
  • lib
  • src
  • exa
  • hlp
  • hex
  • sch
  • pcb
  • doc
mikroPascal PRO for PIC32
  • lib
  • src
  • exa
  • hlp
  • hex
  • sch
  • pcb
  • doc

mikroSDK Library Blog

TouchKey 4 click

TouchKey 4 click

Native view of the TouchKey 4 click board.

View full image
TouchKey 4 click

TouchKey 4 click

Front and back view of the TouchKey 4 click board.

View full image

Library Description

The library initializes and defines I2C bus driver and driver functions which offer a choice to write data in the registers and to read data from the registers. The library also offers a choice to detect touch on enabled sensor inputs in two possible modes, Active and Standby mode.
Every sensor input can be configured to work in both modes at the same time (Combo mode). The sensor inputs can also be configured to detect when touch is released and can generate an interrupt as long as the touch is detected. For more details check the documentation.

Key functions:

void touchkey4_writeReg( const uint8_t register_address, const uint8_t transfer_data ) - The function writes one-byte data in the register.

void touchkey4_readReg( const uint8_t register_address, uint8_t *dataOut, const uint8_t nBytes ) - The function reads data from the register.

void touchkey4_detectTouch( uint8_t *inputSens ) - The function detects touch on the sensor inputs and checks if touch is detected or if touch is released.

void touchkey4_setComboMode( const uint8_t analogGain, const uint8_t enInput1, const uint8_t enInput2, const uint8_t enInput3 ) - Function puts the device in Combo mode (Active and Standby) and enables desired inputs in Active mode, Standby mode or both modes.

Examples Description

  • System Initialization - Initializes peripherals and pins.
  • Application Initialization - IInitializes I2C driver and sets configuration for TouchKey 4 click. TouchKey 4 is configured to works in Combo mode (Active and Standby mode). Input 1 is enabled in Active mode, input 3 is enabled in Standby mode, and input 2 is enabled to works in both modes. In this example, the interrupt will be generated when touch is detected and when touch is released. Also, input 2 will generate an interrupt as long as the touch is detected (press and hold the event), while input 1 and input 3 will generate interrupt only once on one touch detection, after which the touch will be released. Note: Standby mode should be used when fewer sensor inputs are enabled, and when they are programmed to have more sensitivity.
  • Application Task - (code snippet) - Calls function to check touch detection (is interrupt occurred) and shows a message on USB UART if touch is detected or if touch is released on enabled inputs.
void applicationTask()
{
 touchkey4_detectTouch( &sensorResults[0] );
 for (cnt = 0; cnt < 3; cnt++)
 {
 if (sensorResults[ cnt ] == 1)
 {
 if (cnt == 0)
 mikrobus_logWrite( "Input 1 is touched", _LOG_LINE );
 else if (cnt == 1)
 mikrobus_logWrite( "Input 2 is touched", _LOG_LINE );
 else
 mikrobus_logWrite( "Input 3 is touched", _LOG_LINE );
 }
 else if (sensorResults[ cnt ] == 2)
 {
 if (cnt == 0)
 mikrobus_logWrite( "Input 1 is released", _LOG_LINE );
 else if (cnt == 1)
 mikrobus_logWrite( "Input 2 is released", _LOG_LINE );
 else
 mikrobus_logWrite( "Input 3 is released", _LOG_LINE );
 mikrobus_logWrite( "", _LOG_LINE );
 }
 }
}

Other mikroE Libraries used in the example:

  • I2C
  • UART

Additional notes and information

Depending on the development board you are using, you may need USB UART click,  USB UART 2 click or RS232 click to connect to your PC, for development systems with no UART to USB interface available on the board. The terminal available in all MikroElektronika compilers, or any other terminal application of your choice, can be used to read the message.

ALSO FROM THIS AUTHOR

Accel 29 click

0

Accel 29 Click is a compact add-on board that contains an acceleration sensor. This board features the ADXL314, a three-axis ±200g accelerometer from Analog Devices. The ADXL314 offers 16-bit digital output data with a configurable host interface that supports SPI and I2C serial communication. An integrated memory management system with a 32-level FIFO buffer can store data to minimize host processor activity and lower overall system power consumption. Low power modes enable intelligent motion-based power management with threshold sensing and active acceleration measurement at low power dissipation.

[Learn More]

UART Mux click

0

The UART Mux click is a Click board™ that switches the UART pins (RX and TX) from the mikroBUS™ to one of the four available outputs.

[Learn More]

6DOF IMU 3 click

5

The 6 DOF IMU 3 Click is a Click board equipped with the FXOS8700CQ 6-axis sensor with integrated linear accelerometer and magnetometer.

[Learn More]