TOP Contributors

  1. MIKROE (2659 codes)
  2. Alcides Ramos (356 codes)
  3. Shawon Shahryiar (307 codes)
  4. jm_palomino (112 codes)
  5. Chisanga Mumba (90 codes)
  6. S P (73 codes)
  7. dany (71 codes)
  8. MikroBUS.NET Team (35 codes)
  9. NART SCHINACKOW (34 codes)
  10. Armstrong Subero (27 codes)

Most Downloaded

  1. Timer Calculator (136994 times)
  2. FAT32 Library (70112 times)
  3. Network Ethernet Library (56027 times)
  4. USB Device Library (46347 times)
  5. Network WiFi Library (41964 times)
  6. FT800 Library (41286 times)
  7. GSM click (29053 times)
  8. mikroSDK (26489 times)
  9. PID Library (26447 times)
  10. microSD click (25413 times)
Libstock prefers package manager

Package Manager

We strongly encourage users to use Package manager for sharing their code on Libstock website, because it boosts your efficiency and leaves the end user with no room for error. [more info]

< Back
mikroSDK Library

DeviceDrive click

Rating:

5

Author: MIKROE

Last Updated: 2019-07-18

Package Version: 1.0.0.0

mikroSDK Library: 1.0.0.0

Category: WIFI

Downloaded: 2633 times

Not followed.

License: MIT license  

DeviceDrive Click is a complete Cloud-on-Module solution with Wi-Fi functionality and integrated PCB antenna.

No Abuse Reported

Do you want to subscribe in order to receive notifications regarding "DeviceDrive click" changes.

Do you want to unsubscribe in order to stop receiving notifications regarding "DeviceDrive click" changes.

Do you want to report abuse regarding "DeviceDrive click".
  • Information
  • Comments (0)
DOWNLOAD LINK RELATED COMPILER CONTAINS
mikroBasic PRO for ARM
  • lib
  • src
  • exa
  • hlp
  • hex
  • sch
  • pcb
  • doc
mikroBasic PRO for AVR
  • lib
  • src
  • exa
  • hlp
  • hex
  • sch
  • pcb
  • doc
mikroBasic PRO for dsPIC30/33 & PIC24
  • lib
  • src
  • exa
  • hlp
  • hex
  • sch
  • pcb
  • doc
mikroBasic PRO for FT90x
  • lib
  • src
  • exa
  • hlp
  • hex
  • sch
  • pcb
  • doc
mikroBasic PRO for PIC
  • lib
  • src
  • exa
  • hlp
  • hex
  • sch
  • pcb
  • doc
mikroBasic PRO for PIC32
  • lib
  • src
  • exa
  • hlp
  • hex
  • sch
  • pcb
  • doc
mikroC PRO for ARM
  • lib
  • src
  • exa
  • hlp
  • hex
  • sch
  • pcb
  • doc
mikroC PRO for AVR
  • lib
  • src
  • exa
  • hlp
  • hex
  • sch
  • pcb
  • doc
mikroC PRO for dsPIC30/33 & PIC24
  • lib
  • src
  • exa
  • hlp
  • hex
  • sch
  • pcb
  • doc
mikroC PRO for FT90x
  • lib
  • src
  • exa
  • hlp
  • hex
  • sch
  • pcb
  • doc
mikroC PRO for PIC
  • lib
  • src
  • exa
  • hlp
  • hex
  • sch
  • pcb
  • doc
mikroC PRO for PIC32
  • lib
  • src
  • exa
  • hlp
  • hex
  • sch
  • pcb
  • doc
mikroPascal PRO for ARM
  • lib
  • src
  • exa
  • hlp
  • hex
  • sch
  • pcb
  • doc
mikroPascal PRO for AVR
  • lib
  • src
  • exa
  • hlp
  • hex
  • sch
  • pcb
  • doc
mikroPascal PRO for dsPIC30/33 & PIC24
  • lib
  • src
  • exa
  • hlp
  • hex
  • sch
  • pcb
  • doc
mikroPascal PRO for FT90x
  • lib
  • src
  • exa
  • hlp
  • hex
  • sch
  • pcb
  • doc
mikroPascal PRO for PIC
  • lib
  • src
  • exa
  • hlp
  • hex
  • sch
  • pcb
  • doc
mikroPascal PRO for PIC32
  • lib
  • src
  • exa
  • hlp
  • hex
  • sch
  • pcb
  • doc

mikroSDK Library Blog

DeviceDrive Click

DeviceDrive Click

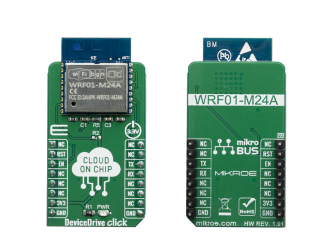
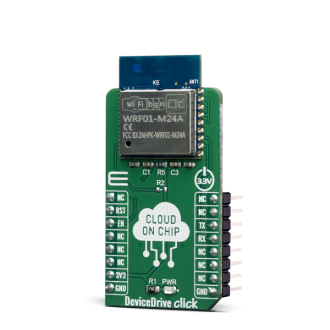
Native view of the DeviceDrive Click board.

View full image
DeviceDrive Click

DeviceDrive Click

Front and back view of the DeviceDrive Click board.

View full image

Library Description

This library allows user to perform a control of the DeviceDrive click and communication between device and cloud. User has options to send commands, configurations, messages, files... Every response from the WRF01 module will be sent to the user via handler function in JSON format. On this way every response on the sent command, every indication, connection status of the local network, device status can be checked and processed by the user. This library has also some necessary and important commands to perform network connection, module configuration and messages sending. For more details check full documentation.

Key functions:

  • void dd_uartDriverInit( T_DD_P gpioObj, T_DD_P uartObj ) - This function initializes UART serial interface.
  • void dd_send_cmd( char *cmd_string ) - This function allows user to send a command to the module.
  • T_DD_RETVAL dd_process( void ) - This function performs a response processing.
  • void dd_setup( const char *param_code, const char *param_value ) - This command allows user to send setup commands to the WRF01.

Examples description

The application is composed of three sections :

  • System Initialization - Initializes peripherals and pins.
  • Application Initialization - Initializes UART serial interface and interrupt, executes wake up sequence and asks user which command will be performed for module setting. Also writes all possible commands to the uart terminal.
  • Application Task - (code snippet) - Checks which character (command) was received from the user and executes the determined command. The response from the module will be received and processed independently on the user, did user send any of the possible commands or not. The response, module and connection status, debug and error reports, command messages will be sent to the uart terminal.
void applicationTask()
{
    rx_cmd = UART_Rdy_Ptr();
    
    if (rx_cmd != _DD_RSP_NOT_READY)
    {
        rx_cmd = UART_Rd_Ptr();
    
        switch (rx_cmd)
        {
            case '1' :
            {
                mikrobus_logWrite( "> send message 1:", _LOG_LINE );
                Delay_ms( 500 );
                dd_send_cmd( &message_1[0] );
            break;
            }
            case '2' :
            {
                mikrobus_logWrite( "> send message 2:", _LOG_LINE );
                Delay_ms( 500 );
                dd_send_cmd( &message_2[0] );
            break;
            }
            case 't' :
            {
                mikrobus_logWrite( "> get time:", _LOG_LINE );
                Delay_ms( 500 );
                dd_get_time();
            break;
            }
            case 'u' :
            {
                mikrobus_logWrite( "> check upgrade:", _LOG_LINE );
                Delay_ms( 500 );
                dd_check_upgrade();
            break;
            }
            case 'f' :
            {
                mikrobus_logWrite( "> factory reset:", _LOG_LINE );
                Delay_ms( 500 );
                dd_factory_reset();
            break;
            }
            case 'c' :
            {
                mikrobus_logWrite( "> connect to network:", _LOG_LINE );
                Delay_ms( 500 );
                dd_set_product_key( &product_key[0] );
                processResponse( 1000 );
                dd_connect( &network_name[0], &network_pwd[0] );
            break;
            }
            case 'i' :
            {
                mikrobus_logWrite( "> introspect:", _LOG_LINE );
                Delay_ms( 500 );
                dd_send_cmd( &introspect_cmd[0] );
            break;
            }
            case 'v' :
            {
                mikrobus_logWrite( "> turn on AP:", _LOG_LINE );
                Delay_ms( 500 );
                dd_show_device( &ap_on[0] );
            break;
            }
            case 'l' :
            {
                mikrobus_logWrite( "> enable debug/error logging:", _LOG_LINE );
                Delay_ms( 500 );
                dd_setup( &debug_mode[0], &set_all[0] );
                processResponse( 1000 );
                dd_setup( &error_mode[0], &set_all[0] );
            break;
            }
            case 's' :
            {
                mikrobus_logWrite( "> status:", _LOG_LINE );
                Delay_ms( 500 );
                dd_status();
            break;
            }
            default :
            {
                mikrobus_logWrite( "> invalid command", _LOG_LINE );
                Delay_ms( 500 );
                logCmd();
            break;
            }
        }
    }

    processResponse( 1 );
}

Additional Functions :

  • getResponse - Gets and stores the response from the WRF01 module (handler function).
  • processResponse - Checks the response in the determined time interval, and when response was ready writes response to the uart terminal.
  • checkCmd - Allows user to enter the desired answer (command), y - yes, n - no.
  • logCmd - Writes all possible commands for the user to the uart terminal.
  • rx_isr - Catches the response bytes from the module one by one, when module was send some bytes to the host.

Other mikroE Libraries used in the example:

  • UART

Depending on the development board you are using, you may need USB UART clickUSB UART 2 click or RS232 click to connect to your PC, for development systems with no UART to USB interface available on the board. The terminal available in all MikroElektronika compilers, or any other terminal application of your choice, can be used to read the message.

ALSO FROM THIS AUTHOR

Current Sens 2 click

0

Current Sens 2 Click is a compact add-on board designed for precise current measurements in industrial applications. This board features the HO 10-P, an AC/DC current transducer from LEM USA.

[Learn More]

RS Transceiver click

0

RS Transceiver is a compact add-on board that offers an interface between the TTL level UART and RS-232/RS-422/RS-485 communication buses. This board features the XR34350, an RS-232/RS-422/RS-485 serial transceiver with internal termination and wide output swing from MaxLinear. Integrated cable termination and four configuration modes allow all three protocols to be used interchangeably over a single cable over the DE-9 connector. All transmitter outputs and receiver inputs feature robust ESD protection and HBM up to ±15kV.

[Learn More]

Expand 14 click

0

Expand 14 Click is a compact add-on board that contains a multi-port I/O expander. This board features the CAT9555, a CMOS device that provides 16-bit parallel input/output port expansion from ON Semiconductor. The CAT9555 contains two 8-bit configuration ports (input or output), input, output, and polarity inversion registers, alongside an I2C-compatible serial interface. Any of the sixteen I/Os can be configured as an input or output by writing to the configuration register. It also features an active-low interrupt output, indicating to the host controller that an input state has been changed.

[Learn More]